Showing posts with label page. Show all posts

Monday, December 5, 2016

New Blogger Widget Contact form Change Style Install in a Static Page

New Blogger Widget Contact form Change Style Install in a Static Page


Just a few days ago, Blogger introduced a new widget. It is about a contact form that you can add to your blog easily. It is very basic, because - at least for now, does not permit incorporating files or send anything other than plain text.  

The contact form for Blogger has the following features:
  • Field for the user name
  • Field for email
  • Field for the message (textarea)
  • Submit Button

DEMO
   

The design is simple and the text colors inherit the section where you add it. At the moment, this widget has no configuration options and is not available for dynamic views.

How to Add Contact Form to Blogger

To add it to your blog, just select the Layout tab, then click on Add a gadget in the section you want to show, for example, in the sidebar. Then, select the More gadgets tab and add the Contact Form gadget.
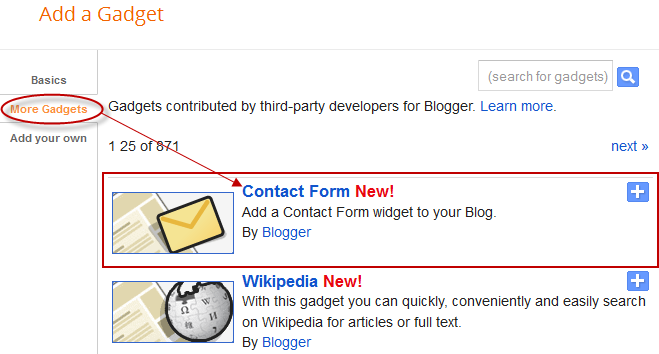

blogger gadgets, blogger widgets, contact form

Styling Contact Form


As the background is transparent, the form will integrate well, aesthetically speaking, but nevertheless it is easy to modify using Style Sheets (CSS) to the appropriate selectors. Heres an example:

/* Contact Form Container */
.contact-form-widget {
width: 500px;
max-width: 100%;
margin: 0 auto;
padding: 10px;
background: #F8F8F8;
color: #000;
border: 1px solid #C1C1C1;
box-shadow: 0 1px 4px rgba(0, 0, 0, 0.25);
border-radius: 10px;
}

/* Fields and submit button */
.contact-form-name, .contact-form-email, .contact-form-email-message {
width: 100%;
max-width: 100%;
margin-bottom: 10px;
}

/* Submit button style */
.contact-form-button-submit {
border-color: #C1C1C1;
background: #E3E3E3;
color: #585858;
width: 20%;
max-width: 20%;
margin-bottom: 10px;
}

/* Submit button on mouseover */
.contact-form-button-submit:hover{
background: #4C8EF9;
color: #ffffff;
border: 1px solid #FAFAFA;
}

This is how it will look like after applying the style:
contact form, blogger gadgets, contact form for blogger

To add this style, go to Template > Edit HTML , click on the sideways arrow next to <b:skin>...</b:skin> and paste the code just above ]]></b:skin> (press CTRL + F to find it):


How To Add Contact Form In A Static Page


First step is to add the Contact Form gadget (Layout) and second, to edit the template (Template > Edit HTML) to remove most of the gadget. You have to search for the id "ContactForm", expand the widget by clicking on the black arrow on the left (same with the includable) and then delete the part that I have colored in red (see below):

Part to be removed:

  <b:widget id=ContactForm1 locked=false title=Contact Form type=ContactForm>
    <b:includable id=main>
  <b:if cond=data:title != &quot;&quot;>
    <h2 class=title><data:title/></h2>
  </b:if>
  <div class=contact-form-widget>
    <div class=form>
      <form name=contact-form>
        <p/>
        <data:contactFormNameMsg/>
        <br/>
        <input class=contact-form-name expr_id=data:widget.instanceId + &quot;_contact-form-name&quot; name=name size=30 type=text value=/>
        <p/>
        <data:contactFormEmailMsg/> <span style=font-weight: bolder;>*</span>
        <br/>
        <input class=contact-form-email expr_id=data:widget.instanceId + &quot;_contact-form-email&quot; name=email size=30 type=text value=/>
        <p/>
        <data:contactFormMessageMsg/> <span style=font-weight: bolder;>*</span>
        <br/>
        <textarea class=contact-form-email-message cols=25 expr_id=data:widget.instanceId + &quot;_contact-form-email-message&quot; name=email-message rows=5/>
        <p/>
        <input class=contact-form-button contact-form-button-submit expr_id=data:widget.instanceId + &quot;_contact-form-submit&quot; expr_value=data:contactFormSendMsg type=button/>
        <p/>
        <div style=text-align: center; max-width: 222px; width: 100%>
          <p class=contact-form-error-message expr_id=data:widget.instanceId + &quot;_contact-form-error-message&quot;/>
          <p class=contact-form-success-message expr_id=data:widget.instanceId + &quot;_contact-form-success-message&quot;/>
        </div>
      </form>
    </div>
  </div>
  <b:include name=quickedit/>

</b:includable>
  </b:widget>

After you have saved the template, go to Pages and paste the following code into a new blank page with the title you want:

 <div class=widget ContactForm id=ContactForm1>
  <div class=contact-form-widget>
    <div class=form>
      <form name=contact-form>
        <p>Name<p>
        <input class=contact-form-name id=ContactForm1_contact-form-name name=name size=30 type=text value=/>
        <p>E-mail *</p>
        <input class=contact-form-email id=ContactForm1_contact-form-email name=email size=30 type=text value=/>
        <p>Message *</p>
        <textarea class=contact-form-email-message cols=25 id=ContactForm1_contact-form-email-message name=email-message rows=5></textarea>
        <input class=contact-form-button contact-form-button-submit id=ContactForm1_contact-form-submit type=button value=Submit/>
        <p class=contact-form-error-message id=ContactForm1_contact-form-error-message></p>
        <p class=contact-form-success-message id=ContactForm1_contact-form-success-message></p>
      </form>
    </div>
  </div>
</div>

Messages will be sent to the same email that you have registered in Blogger.

If you have any Problem with the Post Feel Free to Comment ...


Go to link download

Read more »

Monday, November 14, 2016

How To Add Facebook Like Page Box In Your Bloggers Blog

How To Add Facebook Like Page Box In Your Bloggers Blog


facebook like box
Now in this topic/tutorial I am going to tell you about how you can add a Facebook page like box into your website or blogger blog without difficulty. This is a great widget for blogger blog and websites which is used to promote your fan page and definitely increase your like. 
So, follow these steps to add social media Facebook page like box in blogger.


Add Facebook Page like Box to Blogger:

  •  Log in to your blogger account.
  •  Click on blog title in which you want to add This beautiful like box.
  •  Go to layout and then click on Add a Gadget.
  •  Select Html/JavaScript and paste the below code in it. 


<iframe src="//www.facebook.com/plugins/likebox.php?href=http://www.facebook.com/kutebkhana&amp;width=320&amp;height=275&
amp;colorscheme=light&amp;show_faces=true&amp;border_color&amp;stream=false&amp;header=false&amp;" style="border:none; overflow:hidden; width:320px; height:258px;" ></iframe>


Customization!


  • Replace kutebkhana page title with your own page title.
  •   Change width=320 and height=275 according to your blog template and save the gadget.

 You Are  Done!


Go to link download

Read more »

Thursday, September 8, 2016

Numbered Page Navigation Menu Widget for Blogger

Numbered Page Navigation Menu Widget for Blogger


Bloggers are Really love this widget coz the visitors easily navigates your blog posts and have got idea about how many no posts are there......

you find Numbered navigation widget in different styles.Here we provide one of the coolest among those ....


Lets see how to add this widget....

Follow below steps how to install it :-

Login To Your Blogger And Then Click On Settings And Navigate To Layout Section.

Then Click On Add Page Element.


A new Window Will Open in Which Select Add Html/Javascript.
It will ask For Javascript.

Now Copy The Whole Javascript Below And Paste in it.


<style>

.showpageArea a {

text-decoration:underline;

}

.showpageNum a {

font-weight: bold;

text-decoration:none;

border: 1px solid #000;

background-color:#fff;

margin:0 3px;

padding:3px;

}

.showpageNum a:hover {

border: 1px solid #000;

background-color:#057BD3;

}

.showpagePoint {

color:#fff;

font-weight: bold;

text-decoration:blink;

border: 1px solid #000;

background: #057BD3;

margin:0 3px;

padding:3px;

}

.showpageOf {

text-decoration:none;

padding:3px;

margin: 0 3px 0 0;

}

.showpage a {

text-decoration:none;

border: 1px solid #000;

padding:3px;

}

.showpage a:hover {

text-decoration:none;

}

.showpageNum a:link,.showpage a:link {

text-decoration:none;

color:#333;

}


</style>


<script type="text/javascript">


function showpageCount(json) {

var thisUrl = location.href;

var htmlMap = new Array();

var isFirstPage = thisUrl.substring(thisUrl.length-14,thisUrl.length)==".blogspot.com/";

var isLablePage = thisUrl.indexOf("/search/label/")!=-1;

var isPage = thisUrl.indexOf("/search?updated")!=-1;

var thisLable = isLablePage ? thisUrl.substr(thisUrl.indexOf("/search/label/")+14,thisUrl.length) : "";

thisLable = thisLable.indexOf("?")!=-1 ? thisLable.substr(0,thisLable.indexOf("?")) : thisLable;

var thisNum = 1;

var postNum=1;

var itemCount = 0;

var fFlag = 0;

var eFlag = 0;

var html= ;

var upPageHtml =;

var downPageHtml =;


var pageCount=10;

var displayPageNum=3;

var firstPageWord = First;

var endPageWord = Last;

var upPageWord =Previous;

var downPageWord =Next;


var labelHtml = <span class="showpageNum"><a href="/search/label/+thisLable+?&max-results=+pageCount+">;


for(var i=0, post; post = json.feed.entry[i]; i++) {

var timestamp = post.published.$t.substr(0,10);

var title = post.title.$t;

if(isLablePage){

if(title!=){

if(post.category){

for(var c=0, post_category; post_category = post.category[c]; c++) {

if(encodeURIComponent(post_category.term)==thisLable){

if(itemCount==0 || (itemCount % pageCount ==(pageCount-1))){

if(thisUrl.indexOf(timestamp)!=-1 ){

thisNum = postNum;

}


postNum++;

htmlMap[htmlMap.length] = /search/label/+thisLable+?updated-max=+timestamp+T00%3A00%3A00%2B08%3A00&max-results=+pageCount;

}

}

}

}//end if(post.category){


itemCount++;

}


}else{

if(title!=){

if(itemCount==0 || (itemCount % pageCount ==(pageCount-1))){

if(thisUrl.indexOf(timestamp)!=-1 ){

thisNum = postNum;

}


if(title!=) postNum++;

htmlMap[htmlMap.length] = /search?updated-max=+timestamp+T00%3A00%3A00%2B08%3A00&max-results=+pageCount;

}

}

itemCount++;

}

}


for(var p =0;p< htmlMap.length;p++){

if(p>=(thisNum-displayPageNum-1) && p<(thisNum+displayPageNum)){

if(fFlag ==0 && p == thisNum-2){

if(thisNum==2){

if(isLablePage){

upPageHtml = labelHtml + upPageWord +</a></span>;

}else{

upPageHtml = <span class="showpage"><a href="/">+ upPageWord +</a></span>;

}

}else{

upPageHtml = <span class="showpage"><a href="+htmlMap[p]+">+ upPageWord +</a></span>;

}


fFlag++;

}


if(p==(thisNum-1)){

html += &nbsp;<span class="showpagePoint"><u>+thisNum+</u></span>;

}else{

if(p==0){

if(isLablePage){

html = labelHtml+1</a></span>;

}else{

html += <span class="showpageNum"><a href="/">1</a></span>;

}

}else{

html += <span class="showpageNum"><a href="+htmlMap[p]+">+ (p+1) + </a></span>;

}

}


if(eFlag ==0 && p == thisNum){

downPageHtml = <span class="showpage"> <a href="+htmlMap[p]+">+ downPageWord +</a></span>;

eFlag++;

}

}//end if(p>=(thisNum-displayPageNum-1) && p<(thisNum+displayPageNum)){

}//end for(var p =0;p< htmlMap.length;p++){


if(thisNum>1){

if(!isLablePage){

html = <span class="showpage"><a href="/">+ firstPageWord + </a></span>+upPageHtml+ +html + ;

}else{

html = +labelHtml + firstPageWord + </a></span>+upPageHtml+ +html + ;

}

}


html = <div class="showpageArea"><span style="padding: 2px 4px 2px 4px;margin: 2px 2px 2px 2px;border: 1px solid #333; background-" class="showpage">Page +thisNum+ of +(postNum-1)+: </span>+html;


if(thisNum<(postNum-1)){

html += downPageHtml;

html += <span class="showpage"><a href="+htmlMap[htmlMap.length-1]+"> +endPageWord+</a></span>;

}


if(postNum==1) postNum++;

html += </div>;


if(isPage || isFirstPage || isLablePage){

var pageArea = document.getElementsByName("pageArea");

var blogPager = document.getElementById("blog-pager");


if(postNum <= 2){

html =;

}


for(var p =0;p< pageArea.length;p++){

pageArea[p].innerHTML = html;

}


if(pageArea&&pageArea.length>0){

html =;

}


if(blogPager){

blogPager.innerHTML = html;

}

}


}

</script>


<script src="http://YourBlogName.blogspot.com/feeds/posts/summary?alt=json-in-script&callback=showpageCount&max-results=99999" type="text/javascript"></script>
<spam><a href="http://shakeelasghar.blogspot.com/2012/08/numbered-page-navigation-menu-widget.html" target="_blanck">Get This</a></sapm>


After Adding this Javascript you need to drag and drop the widget below the Blog Posts main widget. See this screen shot


Page Navigation Menu Widget


In the above code you can edit the below lines into your wish .

1 : var pageCount = 10;

The digit in red represents number of posts to be shown in single page. Change the digit to show as many pages you want.


2 : var displayPageNum = 3;

here the digit in red represents number of pages to be listed.


3.YourBlogName.blogsopt.com is replace with blog url.

Now save your template .
Thats it now we have added Page Navigation menu widget to our blog successfully .

Go to link download

Read more »

Sunday, August 7, 2016

Change Facebook Login Page Background in Google Chrome

Change Facebook Login Page Background in Google Chrome


Facebook.com is almost all internet user s favorite place . Bored with having exactly the same dull and boaring Facebook log in page all the time you actually sign in?Effectively after that it’s enough time to Rekindle your own Facebook.com with your personal customized and favorite sign in page design...This method only for google Chrome not working on other browsers like Mozila Forfox.


Let s See How To..??
Just Follow Me......
Open up your Google Chrome & click on " Settings " tab (Top Rigth )
Click on " Tools " 
Then click on " Extentions "
Now . Click on " Browse the Gallery "
Next step is search "  FB Refresh " search Box & hit enter key
Now simply click on " Add To Chrome "
Confirme 

Restart Google Chrome and open Facebook & see the result
You can easily Change Background image...
First upload your favorite image on any free image hosting for example Flicker & copy Image Url
and Click on " Setting " icone


Past your image url & select " Horizontally " or " Vertically " and " Save "


Mission complete...

Go to link download

Read more »