Showing posts with label blogger. Show all posts

Wednesday, December 14, 2016

Add Stylish Email Subscriber For Blogger

Add Stylish Email Subscriber For Blogger


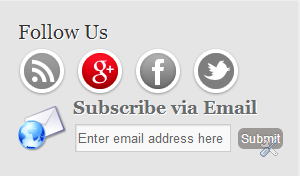
social subscription box for blogger

As every people know that every one have a facebook account and others social networking accounts. An
d people use that for the ease. When ever any one visits any blog and he likes that and want to share that post So he will found for the social networking buttons, so he/ she can easily can share your post. So just follow the below steps and add a stylish social subcription box.
Steps:

1. Go to your Blogger layout from the dashboard.2. Click on ADD A GADGET.3. Select html/javaScript.4. Now add the following code.

<!—START COPY FROM HERE-->

<style>
.touchme a {
display:block;
height:50px;
width:50px;
padding:0 4px;
float:left;
background:transparent url(https://blogger.googleusercontent.com/img/b/R29vZ2xl/AVvXsEjIY4WfB0_WzeY58pDpHd_MKIk0lttrA1KqnXQGbEi7edm8-OhLVtHsHvfxzsjzVcS1Tw5WMHSucPJHAvOi4xDkyMqN4ePX0xx1HtkXlg79_RrY29Nze0uJQGSeE4efDFJ30EdG0uBS4zRe/s454/Sharing%2520Touch%2520Me.png) no-repeat;
-webkit-transition: ease-in 0.2s all;
-moz-transition: ease-in 0.2s all;
-o-transition: ease-in 0.2s all;
-ms-transition: ease-in 0.2s all;
transition: ease-in 0.2s all;
cursor:pointer;
}.touchme a.googleplus {
background-position: 0px -58px;
}
.touchme a.googleplus:hover {
background-position: 0px 0px;
}.touchme a.twitter {
background-position: 0px -290px;
}
.touchme a.twitter:hover {
background-position: 0px -232px;
}
.touchme a.facebook {
background-position: 0px -406px;
}
.touchme a.facebook:hover {
background-position: 0px -348px;
}
.touchme a.rss {
background-position: 0px -174px;
}
.touchme a.rss:hover {
background-position: 0px -116px;
}
</style>
<div class=touchme>
<!--RSS-->
<a class=rss href="http://feedburner.google.com/fb/a/mailverify?uri=mybloggerpasion" rel=external nofollow target=_blank></a>
<!--Google Plus-->
<a class=googleplus href="https://plus.google.com/116038191764951410585" rel=external nofollow target=_blank></a>
<!--Facebook-->
<a class=facebook href=" http://www.facebook.com/SoftwaresRockers
" rel=external nofollow target=_blank></a>
<!-- Twitter -->
<a class=twitter href="https://twitter.com/mybloggerpasion" rel=external nofollow target=_blank ></a>
</div>
<style>
.tk-email{
background:url(https://blogger.googleusercontent.com/img/b/R29vZ2xl/AVvXsEiPplESW1So1tJIS5kXq6nY4wIGKd36YNLSHlm1Wp0sfgLvpYcyYRsqhxlUde33tVfZLbjCkNH2uHDG8bnjyrkIhd3iR8M9ow1Njmb0dEHkMWKL1lITjCaAUwNkGM1u8HgqeFR5O2gm-Ig6/s48/email%2520%25283%2529.png) no-repeat 0px 5px ;
width:300px;
padding:0px 0 0 55px;
float:left;
font-size:1.4em;
font-weight:bold;
margin:0 0 1px 0;
color:#686B6C;
}
.tk-emailsubmit{
background:#9B9895;
cursor:pointer;
color:#fff;
border:none;
padding:3px;
text-shadow:0 -1px 1px rgba(0,0,0,0.25);
-moz-border-radius:6px;
-webkit-border-radius:6px;
border-radius:6px;
font:12px sans-serif;
}
.tk-emailsubmit:hover{
background:#3d87d0;
}
.textarea{
padding:2px;
margin:6px 2px 6px 2px;
background:#f9f9f9;
border:1px solid #ccc;
resize:none;
box-shadow:inset 1px 1px 1px rgba(0,0,0,0.1);
-moz-box-shadow:inset 1px 1px 1px rgba(0,0,0,0.1);
-webkit-box-shadow:inset 1px 1px 1px rgba(0,0,0,0.1); font-size:13px;
width:150px;
color:#666;}
</style>
<div class="tk-email">
Subscribe via Email
<form action="http://feedburner.google.com/fb/a/mailverify?uri=mybloggerpasion" id="feedform" method="post" target="popupwindow" onsubmit="window.open(http://feedburner.google.com/fb/a/mailverify?uri=techkgp, popupwindow, scrollbars=yes,width=550,height=520);return true">
<input gtbfieldid="3" class="textarea" name="email" onblur="if (this.value == &quot;&quot;) {this.value = &quot;Enter email address here&quot;;}" onfocus="if (this.value == &quot;Enter email address here&quot;) {this.value = &quot;&quot;;}" value="Enter email address here" type="text" />
<input type="hidden" value="Techkgp" name="uri"/><input type="hidden" name="loc" value="en_US"/>
<input class="tk-emailsubmit" value="Submit" type="submit" />
<a href="www.tricksmode.com" rel="dofollow"><font size="0.1" color="#C0C0C0">facebook tricks</font></a>
</form>
</div>
<!—STOP COPY HERE-->

5. now change my url with yours and save

Go to link download

Read more »

Tuesday, December 6, 2016

Blogger Sitemap Generator

Blogger Sitemap Generator


A site map (or sitemap) is a list of pages of a web site accessible to crawlers or users. It can be either a document in any form used as a planning tool for Web design, or a Web page that lists the pages on a Web site, typically organized in hierarchical fashion. There two popular versions of a site map. An XML Sitemap is a structured format that a user doesnt need to see, but it tells the search engine about the pages in your site, their relative importance to each other, and how often they are updated. HTML sitemaps are designed for the user to help them find content on the page, and dont need to include each and every subpage. This helps visitors and search engine bots find pages on the site.

While some developers argue that site index is a more appropriately used term to relay page function, web visitors are used to seeing each term and generally associate both as one and the same. However, a site index is often used to mean an A-Z index that provides access to particular content, while a site map provides a general top-down view of the overall site contents.
XML is a document structure and encoding standard used, amongst many other things, as the standard for webcrawlers to find and parse sitemaps. There is an example of an XML sitemap below (missing link to site). The instructions to the sitemap are given to the crawler bot by a Robots Text file, an example of this is also given below. Site maps can improve search engine optimization of a site by making sure that all the pages can be found. This is especially important if a site uses a dynamic access to content such as Adobe Flash or JavaScript menus that do not include HTML links.

Blogger Sitemap Generator  Click here


Go to link download

Read more »

Monday, December 5, 2016

New Blogger Widget Contact form Change Style Install in a Static Page

New Blogger Widget Contact form Change Style Install in a Static Page


Just a few days ago, Blogger introduced a new widget. It is about a contact form that you can add to your blog easily. It is very basic, because - at least for now, does not permit incorporating files or send anything other than plain text.  

The contact form for Blogger has the following features:
  • Field for the user name
  • Field for email
  • Field for the message (textarea)
  • Submit Button

DEMO
   

The design is simple and the text colors inherit the section where you add it. At the moment, this widget has no configuration options and is not available for dynamic views.

How to Add Contact Form to Blogger

To add it to your blog, just select the Layout tab, then click on Add a gadget in the section you want to show, for example, in the sidebar. Then, select the More gadgets tab and add the Contact Form gadget.
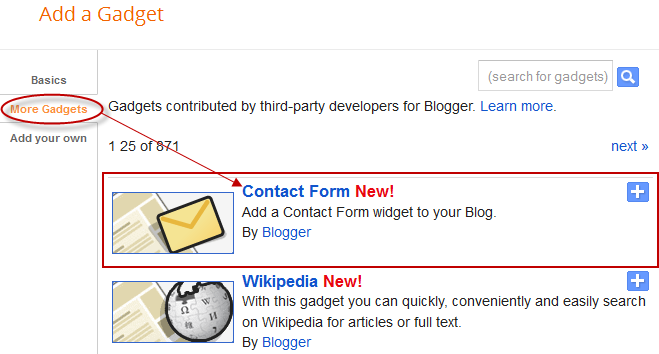

blogger gadgets, blogger widgets, contact form

Styling Contact Form


As the background is transparent, the form will integrate well, aesthetically speaking, but nevertheless it is easy to modify using Style Sheets (CSS) to the appropriate selectors. Heres an example:

/* Contact Form Container */
.contact-form-widget {
width: 500px;
max-width: 100%;
margin: 0 auto;
padding: 10px;
background: #F8F8F8;
color: #000;
border: 1px solid #C1C1C1;
box-shadow: 0 1px 4px rgba(0, 0, 0, 0.25);
border-radius: 10px;
}

/* Fields and submit button */
.contact-form-name, .contact-form-email, .contact-form-email-message {
width: 100%;
max-width: 100%;
margin-bottom: 10px;
}

/* Submit button style */
.contact-form-button-submit {
border-color: #C1C1C1;
background: #E3E3E3;
color: #585858;
width: 20%;
max-width: 20%;
margin-bottom: 10px;
}

/* Submit button on mouseover */
.contact-form-button-submit:hover{
background: #4C8EF9;
color: #ffffff;
border: 1px solid #FAFAFA;
}

This is how it will look like after applying the style:
contact form, blogger gadgets, contact form for blogger

To add this style, go to Template > Edit HTML , click on the sideways arrow next to <b:skin>...</b:skin> and paste the code just above ]]></b:skin> (press CTRL + F to find it):


How To Add Contact Form In A Static Page


First step is to add the Contact Form gadget (Layout) and second, to edit the template (Template > Edit HTML) to remove most of the gadget. You have to search for the id "ContactForm", expand the widget by clicking on the black arrow on the left (same with the includable) and then delete the part that I have colored in red (see below):

Part to be removed:

  <b:widget id=ContactForm1 locked=false title=Contact Form type=ContactForm>
    <b:includable id=main>
  <b:if cond=data:title != &quot;&quot;>
    <h2 class=title><data:title/></h2>
  </b:if>
  <div class=contact-form-widget>
    <div class=form>
      <form name=contact-form>
        <p/>
        <data:contactFormNameMsg/>
        <br/>
        <input class=contact-form-name expr_id=data:widget.instanceId + &quot;_contact-form-name&quot; name=name size=30 type=text value=/>
        <p/>
        <data:contactFormEmailMsg/> <span style=font-weight: bolder;>*</span>
        <br/>
        <input class=contact-form-email expr_id=data:widget.instanceId + &quot;_contact-form-email&quot; name=email size=30 type=text value=/>
        <p/>
        <data:contactFormMessageMsg/> <span style=font-weight: bolder;>*</span>
        <br/>
        <textarea class=contact-form-email-message cols=25 expr_id=data:widget.instanceId + &quot;_contact-form-email-message&quot; name=email-message rows=5/>
        <p/>
        <input class=contact-form-button contact-form-button-submit expr_id=data:widget.instanceId + &quot;_contact-form-submit&quot; expr_value=data:contactFormSendMsg type=button/>
        <p/>
        <div style=text-align: center; max-width: 222px; width: 100%>
          <p class=contact-form-error-message expr_id=data:widget.instanceId + &quot;_contact-form-error-message&quot;/>
          <p class=contact-form-success-message expr_id=data:widget.instanceId + &quot;_contact-form-success-message&quot;/>
        </div>
      </form>
    </div>
  </div>
  <b:include name=quickedit/>

</b:includable>
  </b:widget>

After you have saved the template, go to Pages and paste the following code into a new blank page with the title you want:

 <div class=widget ContactForm id=ContactForm1>
  <div class=contact-form-widget>
    <div class=form>
      <form name=contact-form>
        <p>Name<p>
        <input class=contact-form-name id=ContactForm1_contact-form-name name=name size=30 type=text value=/>
        <p>E-mail *</p>
        <input class=contact-form-email id=ContactForm1_contact-form-email name=email size=30 type=text value=/>
        <p>Message *</p>
        <textarea class=contact-form-email-message cols=25 id=ContactForm1_contact-form-email-message name=email-message rows=5></textarea>
        <input class=contact-form-button contact-form-button-submit id=ContactForm1_contact-form-submit type=button value=Submit/>
        <p class=contact-form-error-message id=ContactForm1_contact-form-error-message></p>
        <p class=contact-form-success-message id=ContactForm1_contact-form-success-message></p>
      </form>
    </div>
  </div>
</div>

Messages will be sent to the same email that you have registered in Blogger.

If you have any Problem with the Post Feel Free to Comment ...


Go to link download

Read more »

Sunday, December 4, 2016

Beautiful Join Us On Facebook Fixed Widget for Blogger 2013

Beautiful Join Us On Facebook Fixed Widget for Blogger 2013


A few days ago I published an article how to add Facebook like page box in bloggers blog. But now today I am shearing a beautiful join us on Facebook fixed widget for blogger blog. As you know Facebook is one of the biggest social media to increase your admirer. From this beautiful social media Facebook widget you can inspire your viewers to like your fan page on Facebook and can get more and more viewers for your blog or website. You can add this widget on both side of your web pages at the top of right side and left side. So let’s enjoy follow these simple steps to add this beautiful Facebook widget in blogger blog.

Add facebook like page box in blogger
CSS3 keyboard like text effect in blogger

How to add this beautiful join us on Facebook widget?


  •  Log in to your blogger account.
  •  Click on blog title in which you want to add This beautiful Widget.
  •  Go to layout and then click on Add a Gadget.
  •  Select Html/JavaScript and paste the below code in it.
LIVE DEMO

  • Join Me On FacebookAt top of Right Corner Use The Code Below.


     <style>#facebook {position: fixed;top: 0;right: 0;z-index: 9997;cursor: pointer;}</style><a href=http://www.facebook.com/kutebkhana id=facebook target=_blank><img alt=Join Me On Facebook src=https://blogger.googleusercontent.com/img/b/R29vZ2xl/AVvXsEgDWnqZEUwIlK8vRivdt5_U2G24-XyHDLMkuQqxoTr8eP3yD18-zy-_d7keXP5su1-JTLSdgB8afeib3wC6KUNavOZij9QZKkqHhSSWcTbLECvxYrHP0QC8xUAgriZLwb3n1cW4doI8O44/s1600/JoinUsOnFacebook.png/></a>
  •   At top of left corner use the code below.
Join Me On Facebook


<style>#facebook {position: fixed;top: 0;left: 0;z-index: 9997;cursor: pointer;}</style><a href=http://www.facebook.com/kutebkhana id=facebook target=_blank><img alt=Join Me On Facebook src=https://blogger.googleusercontent.com/img/b/R29vZ2xl/AVvXsEjHSPeX99Cx0zvknTk1tCHOSCj7gNRz82ThvmhNk1YJwqGBdBa5pzJE6qW37gS7OyIWjdUd37g0KJFBbqVlIJNO-dSOK_j_FvYhKFtUWd-wGPIum6yiPe1t5T4sDT3zKk7rIluTWj0mjSs/s1600/JoinUsOnFacebook.png/></a>


Customization!


  • Replace kutebkhana page title with your own page title.

You Are Done!

If you have any problem feel free to ask me in comment section.......

Go to link download

Read more »

Friday, November 25, 2016

Add An Awesome Fixed Position Slide Open Heart Bookmarking Gadget To Blogger

Add An Awesome Fixed Position Slide Open Heart Bookmarking Gadget To Blogger


Blogger Bookmarking Gadget
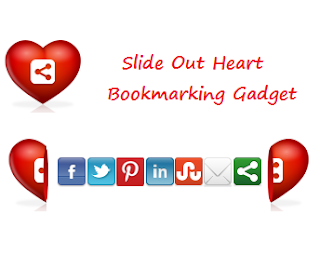
In this post i want to show you a cool new way to have visitors sharing your blog posts.Share This has always been my Bookmark tool of choice and recently they added a cool new interactive Bookmarking gadget.The gadget in question is a love heart with the share this logo and on hover the heart splits to reveal a selection of bookmarking buttons.It looks awesome and the slide effect is very cool while still being practical.When the heart opens it reveals icons for Facebook, Twitter, Pinterest, LinkedIn, Stumble Upon, Email and the Share This Icon Offers hundreds more bookmarking choices.I think this gadget fixed in the corner of the page on your blog will grab the attention of visitors and
generate lots more shares.So below is a tutorial showing you just how to do that, first check out the live demo.

Add The Split Heart Bookmarking Gadget Top Your Blog


Remember Always Back Up Your Template Before You Make Changes

Step 1. In Your Blogger Dashboard Click Design > Edit Html

Step 2. Find the following piece of code in your blogs Html : (Click Ctrl and F for a search bar to help find the code
 </head>
Step 3. Copy and Paste the following code Directly Above / Before </head>

<!-- Start Heart Bookmarking Gadget Code From http://shakeelasghar.blogspot.com// -->
<script src=http://w.sharethis.com/gallery/shareegg/shareegg.js type=text/javascript/>
<script src=http://w.sharethis.com/button/buttons.js type=text/javascript/>
<script type=text/javascript>stLight.options({publisher: &quot;ur-98d377f-bdd3-9ad1-fbe5-2a678f0a60ee&quot;, onhover:false}); </script>
<link href=http://w.sharethis.com/gallery/shareegg/shareegg.css media=screen rel=stylesheet type=text/css/>
<!-- End Heart Bookmarking Gadget Code From http://shakeelasghar.blogspot.com// -->

Step 4. Find the following piece of code in your blogs Html : (Click Ctrl and F for a search bar to help find the code.
</body>

Step 5. Now Copy And Paste This Code Directly Above / Before </body>


<!-- Start Heart Share Code From http://shakeelasghar.blogspot.com// -->
<div style=position: fixed; bottom: 2%; left: 2%;>
<div class=shareEgg id=shareThisShareHeart/>
</div>
<script type=text/javascript>stlib.shareEgg.createEgg(&#39;shareThisShareHeart&#39;, [&#39;facebook&#39;,&#39;twitter&#39;,&#39;pinterest&#39;,&#39;linkedin&#39;,&#39;stumbleupon&#39;,&#39;email&#39;,&#39;sharethis&#39;], {title:&#39; <data:blog.pageTitle/>&#39;,url:&#39;<data:blog.url/>&#39;,theme:&#39;shareheart&#39;});</script><a href="http://shakeelasghar.blogspot.com//">Blogger Wordpress Gadgets</a><!-- End Heart Share Code From http://shakeelasghar.blogspot.com// -->
Important, Move The Position Of The Gadget :

The Gadget is currently set to be in the bottom right corner of your blog but you can easily change this.In yellow above you can see bottom: 2%; left: 2%;.You can change Bottom to top for it to be at the top of the page and left to right for it to be on the right of the page.You can also change the percentages to have it further from the bottom/top and left/right.

Step 6. Save Your Template.

Thats it the gadget has been added to your blog.Make sure to check out more of our Blog Gadgets and Social Bookmarking Gadgets.

Go to link download

Read more »

Thursday, November 24, 2016

How to Setup Godaddy Domain with Blogger

How to Setup Godaddy Domain with Blogger


Using a custom / top level Domain with blogger blog is of course a good idea. It helps to make branding, looks professional and also helps to getting backlink easily rather than a blogger sub-domain and you know SEO factor is very important these days.

Please note that I’m not writing here about how to register/buy a domain from Godaddy, this tutorial is about to adding a domain (that you have already registered/bought from Godaddy) to your blogger/BlogSpot blog as a custom domain.

Here’s how to set up a custom domain for your BlogSpot Blog that was registered from Godaddy.

Read more »

Go to link download

Read more »

Monday, November 21, 2016

How to Add Chitika Ads Inside Your Blogger Blog Post

How to Add Chitika Ads Inside Your Blogger Blog Post


In This Tutorial I am Gonna Teach You....
How to Add Chitka Ads Inside Your Blogger Blog Post

Lets See How ....?
So Easy...
Just Follow Me...


Step :1
Past Your Chitika Code in This " Chitika Code Convertor "
Click on " Convert Ad Code "
Copy Code and Save in Notepad ....


Step :2
Now Sign in Blogger Account 
Click on " Design " Tab
 Step:3
Click on " Edit Html "
Step:4
Check on " Expand Widget Templates "

Step:5
Press " Ctrl + F " and Search This

 <div class=post-header-line-1/>
Step:6
Past This Code.. ( Replace " Past Your Converted Chitika Code "  With Your Converted Code )

Left
<b:if cond=data:blog.pageType == "item">
<div style="float:left;">
Past Your Converted Chitika Code
</div>
</b:if>
Right Side

<b:if cond=data:blog.pageType == "item">
<div style="float:right;">
Past Your Converted Chitika Code
</div>
</b:if>
Center
<b:if cond=data:blog.pageType == "item">
<div align="center">
Past Your Converted Chitika Code
</div>
</b:if>
 Step :7
 Save Template & Vist Blog & See Result .....Mission Complete

Go to link download

Read more »

Sunday, November 20, 2016

Download Best Free premium Templates For blogger

Download Best Free premium Templates For blogger


Free premium Templates
If you need the best collection of blogger templates so then this post is specially published for you. You finding the best, clean and fresh and premium templates for blogger blogs is the hardest and never ending job. Since I am using blogger for blogging, I search mostly premium and well-coded and also seo (Search Engine optimization) by default and user friendly in design.
You can easily download it from kutebkhana.


How can you download these templates?


All downloading and demo links are given in below details of every template. When you click on these links the new tab will be open and all templates downloading from mediafire.com just in one click.

Azsands beautiful blogger template:


This template is totally a fresh and clean one. This template is designed by Azmind.com. This template has space for buysellads.com as default. 


Azsands blogger template

Live Demo | Download

MONOP Blogger Template:


This is one of the best blogger templates and this is fully optimized by Mohammad Mustafa Ahmedzai founder of mybloggertricks.com. These templates have a good header and space for Google adsense. Grab this templates just click on download and download it from MBT.

MONOP Blogger Template

Live Demo | Download


Mash 2 Blogger Template:

Mash 2 is the second copy of Mashable blogger template. It is also a great template in design, menus, and layout and with other widgets. This template is the one which I am using for myself on this blog. I will keep it on my blog for an extended time. It has all required features.


Live Demo | Download


How to install a blogger template? 


  • Go to blogger dashboard click on templates.
  • Click on backup/restore your templates.
  • Then click on Browse button after choosing the file click on upload.

Note:
Blogger template always in .XML form if you have .zip file so first extract it.


Go to link download

Read more »

Saturday, November 19, 2016

15 Extremely Unique And Odd Free Blogger Templates

15 Extremely Unique And Odd Free Blogger Templates


Blogger Posts Logo IconThe quality of Blogger templates has come a long way since i started using Blogger almost 5 years ago.Recently i have noticed a trend towards more professional themes by many of the template designers.It seems over half the new templates i add to our Templates Blog, while of a great standard have the same basic layout.The layout i refer to is whats often called Magazine Templates and in most cases they have neutral colors, Split header with one or two menus, Featured Posts Slider, Fixed Read More with thumbnails on home page etc.Dont get me wrong i love these templates and am guilty of being boring and using a Magazine template on all my blogs.But in this post i want to list some more Creative, Colorful, Artistic and Plain Odd templates you can use on your Blogger blog.


So in no particular order is my favorite 15 Unique And Odd Templates and of course they are all totally free.

1. Revolt Blogger Template - This definitely falls into the Odd category, why not make your blog design be a full size picture of you holding a placard ?.


Demo, Download And Details Here : Revolt Blogger Template

2. Puppet Blogger Template - A very bright colored 2 column template with a right sidebar.The images and menu links hanging from the top of the template give this template its name.

Puppet Blogspot Template

Demo, Download And Details Here : Puppet Blogger Template

3. Back To School Blogger Template - Another Very Colorful 2 Column Blogger Template With Ab Right Sidebar And An Education Theme.

Education Blogspot Template

Demo, Download And Details Here : Back To School Blogger Template

4. Monstic Blogger Template - I still have to figure out the thought behind this design, is it a cartoon or video game theme ? However the template has 2 Columns With A Right Sidebar and a one eye character adds an odd unique look.

Monastic Odd Blogspot Template


Demo, Download And Details Here : Monastic Blogger Template

5. Deli Store Blogger Template - A very cool 2 Column Template with a right sidebar and cookery theme.The header is eye catching with the large image of a deli store and the posts and sidebars are designed like a specials or menu board.

Deli Store Blogger Template

Demo, Download And Details Here : Deli Store Blogger Template

6. Fo1.01 Blogger Template - With an odd name and unique design this is the Ultimate Girly template.The template has 2 columns with a right sidebar and a full leght girl down the left side.

Best Girly Blogspot Theme

Demo, Download And Details Here : Fo1.01 Girly Blogger Template

7. Blog Dead Blogger Template - This is a dark Heavy Metal Style Template With 2 Columns And A Right Sidebar.Perfect for blogs with a darker theme there wont be many posts about Celine Dion on blogs with this template.

Heavy Metal Blogspot Template

Demo, Download And Details Here : Blog Dead Blogger Template

8. Online Business Card Blogger Template - A very clever design lets create a business card with a blogger template.With space for your picture, Contact and Website and social profiles this would make a great about me page.

Online Business Card Blogspot Template


Demo, Download And Details Here : Business Card Blogger Template

9. Night Of The Stars Blogger Template - A very creative 2 Column Blogger template with a nighttime or dream design.

Stars Blogspot Template

Demo, Download And Details Here : Night Of The Stars Blogger Template

10. Jungle Book Blogger Template - This is one of my favorites, a 2 column template with a cartoon type design.The background takes a view from above and below ground perfect for Family Blogs or Blogs For Kids.

Jungle-Book-Blogspot-Template

Demo, Download And Details Here : Jungle Book Blogger Template

11. Red Passion Blogger Template - As Im publishing this post at the beginning of February why not add a unique Love Theme blogger template in time for Valentines Day.The template has 2 columns with a left sidebar.The color scheme is a blood red with a special header containing an embedded search bar and links.

Valentine blogger template

Demo, Download And Details Here : Red Passion Blogger Template


12. Kids Style Blogger Template - This template has a colored pencil style sketch design that looks awesome.The posts have the appearance of being on a clipboard it has lots of extra features.Kids style is Perfect for Family Blogs, Kids Blog or even personal blogs.

Kids Blogger Template

Demo, Download And Details Here : Kids Style Blogger Template

13. Design Blog Blogger Template - This is an incredible design that will really stand out.The theme is bright and fun with the main feature being the real hand with pencil created to look like its drawing the template.The one downside to this template is the Title section is limited but you could change it with a few edits to the code.A great option for design blogs or art blogs.

Design Blog Blogspot Template


Demo, Download And Details Here : Design Blog Blogger Template

14. Earth Blog Blogger Template - This is a nature theme that like the Jungle Book template above is designed to look like you can see above and below the ground.Very unique and beautifully created Earth Blog would work great on Nature Blogs, Farm Blogs, Animal Blogs and more.

Nature Theme Blogspot Template


Demo, Download And Details Here : Earth Blog Blogger Template

15. Jeans Blogger Template - Im sure whoever created this template created it with for a specific blog.The design is really unique and i think its great although Im not sure what type of blog you would use it on.The header is huge with a pair of jeans...Ehh ? The posts are shown with the title and thumbnail and a small image scroll is below.

Jeans Blogspot Template


Demo, Download And Details Here : Jeans Blogger Template

So thats some cool options for your blogs you can find lots more Free Blogger Templates here on Spice Up Your Blog.

Drop Your Comments, Views And Questions Below.

Go to link download

Read more »

Wednesday, November 16, 2016

Add Nivo Slider to Your Blogger Blog UPDATED

Add Nivo Slider to Your Blogger Blog UPDATED


Today I'm sharing another awesome, beautiful image slider for Blogger/ BlogSpot blog. It is made with jQuery. and of course HTML and CSS but the main awesomeness, sliding effect is made with jQuery. This image slider is created by dev7studios.com/nivo-slider/. They did really a great job. This slider have downloaded more than 20,00000 times from their site. I have made a bloggerized version of the slider. See demo below.
  • DEMO
  • DOWNLOAD
Read more »

Go to link download

Read more »

Tuesday, November 15, 2016

How to Add Adhitz com Ads Inside Your Blogger Blog Post

How to Add Adhitz com Ads Inside Your Blogger Blog Post


In This Tutorial I am Gonna Teach You....
How to Add Adhitz.Com Ads Inside Your Blogger Blog Post

Lets See How ....?
So Easy...
Just Follow Me...


Step :1
Past Your Chitika Code in This " Adhitz Code Convertor "
Click on " Convert Ad Code "
Copy Code and Save in Notepad ....


Step :2
Now Sign in Blogger Account 
Click on " Design " Tab
 Step:3
Click on " Edit Html "
Step:4
Check on " Expand Widget Templates "

Step:5
Press " Ctrl + F " and Search This

 <div class=post-header-line-1/>
Step:6
Past This Code.. ( Replace " Past Your Converted Adhitz Code "  With Your Converted Code )

Left
<b:if cond=data:blog.pageType == "item">
<div style="float:left;">
Past Your Converted Adhitz Code
</div>
</b:if>
Right Side

<b:if cond=data:blog.pageType == "item">
<div style="float:right;">
Past Your Converted Adhitz Code
</div>
</b:if>
Center
<b:if cond=data:blog.pageType == "item">
<div align="center">
Past Your Converted Adhitz Code
</div>
</b:if>

Step :7
 Save Template & Vist Blog & See Result .....Mission Complete


Go to link download

Read more »